Sometimes campaigning or events-promoting websites include a call to "please add our button / widget to your website". There's a piece of code made available and if you put it in the right bit of your website's layout it will appear as a clickable image.
- But what if there isn't a widget available and you want to add one?
- Also, what happens if you're using Wordpress dot com (not the self-hosted dot org version) and won't be able to add a bit of code anyway?
You can see an example on the right hand side of this blog for the Open Air Cinema listings page on this site. The original one I made was for one of my work websites, see the Computing At School logo example I created for my work: Teaching London Computing).
What's the benefit of this? Why do it?
- Every time any page on your site loads the clickable image is available on the sidebar, meaning that more people might see it.
- If, as part of a promotional campaign, lots of people have the same image in their sidebars then this obviously increases the numbers of people that might see it (and some may click on it).
- The more links there are to a particular site the more this tells Google (which indexes all of the blogs and websites that are linking to it) that the target site is of value. Apparently high-ranking blogs and websites will increase this further but you can never tell what algorithm Google is working with so I'd not rely on that.
You will need
A picture - I've generally assumed that if I'm advertising someone's event then it's probably OK to use their logo or a relevant advertise-y image from their website, but it's wise to check, please don't steal others' work.
A link - when people click on the picture what website do you want them to go to? Might be an Eventbrite page, or might be an event info landing page which then directs them to the Eventbrite page.
A wordpress.com website or Blogger blog
1. The process - for Wordpress.com blogs (where they call them widgets)
• Get your picture (see 'first catch your picture' below if you don't have one)
• Make a note of the web address you want visitors to go to (when they click the picture)
• Add the picture to the Media library of your Wordpress site - then Edit the picture (not really, you just want to open the editing window from which you can capture the media file's address - you'll need it in a moment)
• Now you have two addresses (one's a Wordpress Media file store address, one's the site you want visitors to go to)
• Open the Widget settings [just stick /wp-admin/widgets.php after your website's homepage name].
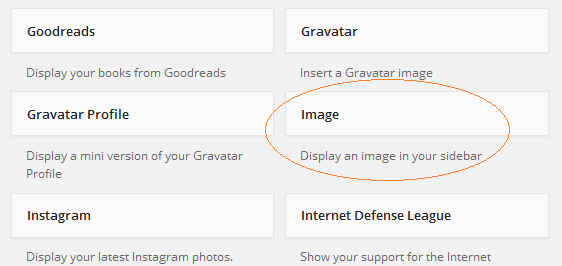
• The widget you want (see pic below) is called "Image: Display an image in your sidebar" - you'll need to click and drag it to the relevant sidebar (or footer) section before you can enter the picture and link. The sidebars are the blocks to the right of your website text and usually include things like recent posts (archives) - you can add all sorts of stuff to them.
• Once you've done that the Image widget will open and ask you for information - you only need to tell it two things. (1) Where to find the image (see pic below: into the box with the *green star paste in the file's address (the Media library address^) - this will make sure the widget displays your image). (2) The address that the image will point to (ie when visitors click on it, where they'll go). In the pic below put the website address in the box with the *blue star. Then click save and have a look at your homepage to see if it's there.
^Getting the media library address for your picture
Navigate to your Media Library or just stick /wp-admin/upload.php after the end of your blog's homepage address and that should take you there. I see a large grid of media that I've uploaded including documents, pictures etc. Click on any of them and it will open up within the screen (you can close it with the little X on the right hand side, don't use the back button or you may go somewhere else). Collect the relevant address from the field marked URL in the panel on the right hand side - that's what you'll put into the Image URL field starred in green below.

2. The process - for Blogger / blogspot blogs (where they call them gadgets)
• Get your picture (see 'first catch your picture' below if you don't have one)
• Make a note of the web address you want visitors to go to (when they click the picture)
• Visit your dashboard, in particular your layout, which looks like this, then click on 'Add a Gadget' (highlighted in green below).

• There's a wide range of available gadgets but the relevant one is 'Image' - click the white on blue plus symbol to select it.

• Doing that will bring up the 'edit gadget' options, it looks like this. On the left is the blank version and on the right is a completed example.

*remember when linking to an image on the internet link to it directly, NOT the page on which it sits - ie the web address probably ends in .jpg rather than .html.
Afterwards you can decide the order (where abouts on the page the image will appear) in the layout. Then save your new arrangement and check how it looks on the live blog.
First catch your image
If you're on a website with an image you like (and be mindful of copyright and how you're using it) then right click / save as to capture a copy before uploading it to your Media library [add /wp-admin/media-new.php to the end of your website's homepage].
For previous ones (events now finished, pics removed) on this blog I used an event flyer PDF and reduced it in size so that I could take a screenshot of it, tidy it up a bit in Paint and save it as an image file which I then uploaded. I also used it on another blog (Sound stuff) along with two other music events, picture reproduced below.

For this one I took a screenshot of the page which had this as part of a larger image and cut it down in Paint. I copied the logo and used PowerPoint to reduce it in size - it's a better programme for resizing things because you can hold the shift key and maintain aspect ratio (keeps height and width in correct ratio to one another, it's possible to do this in Paint but I've found PowerPoint's better). I used Paint to paste the logo onto the image and arrange it as seen.
Delicious film
I found an image of Delicious on the film's Eventbrite page, along with the phrase "UK premiere" - took a screenshot of the whole page and edited it Paint so that the words sat at the bottom of the image.
David Arnold live in concert
This one comes from the official event flyer PDF - I just opened it, resized it to about 50% (really any size will do that makes it easy for you to take a screenshot), took a screenshot of the page and got rid of white space and grey background, neatened it up so that it had a black border and save it as an image file.
The picture will be resized the minute you put it into the Image widget anyway so best to start large so that when reduced the text isn't a complete blur.
Troubleshooting
Depending on the theme you have it may not be possible or practical to have a sidebar or anywhere to put the image widget, I'm afraid I can't help with that.
Possible questions
Can I link it to a file, eg a Word document or PDF?
Yes - all you'll need then is the address of the file instead - since you can add documents to your media library on wordpress you might as well do that, but any link that opens the doc will do (eg if it's hosted somewhere else).