This is a detailed 'long read' post, if you're after a briefer overview please see How to use Storify like a pro to collect tweets over on my dedicated 'how to do techy things' blog.
Storify is a tool that lets you thread together individual tweets (and also capture them for posterity, even if deleted) to form a story or record of a discussion. You can also capture any individual 'bit' of social media including an Instragram photograph, a blog post, a YouTube video etc. Once published you can share your Storify as a link on Twitter or even embed it into a blog post (except free Wordpress.com which doesn't let you do that) or you can keep the story as a private draft copy. The free Storify tool has changed a lot since I first wrote the above article and I thought I'd update it with some new screenshots.
Visit Storify at http://storify.com. The first thing to do is to log in or create an account - if you've never used the service before you might need to use the green 'Sign Up Free' to start (I honestly can't remember) but you could also try the pale blue 'Log In' button on the top right to log in with Facebook or Twitter accounts.
Table of Contents
- Logging in
- Starting a new story
- Twitter and other social media services
- Twitter in depth: adding tweets to your Storify
- Using the Embed link / Embed URL icon
- Setting the main image icon
- Things to be aware of - a round-up
1. Logging in
Images: click on any image to enlarge it, then look for an X on the page to close it and return to this post or use the back button on your browser.
 Figure 1. This is the start screen at http://storify.com
Figure 2. This is the option you see once clicking on the green button on the start page.

Figure 3. ...and this is the option if you click the pale blue 'Log in' option on the front page.
2. Starting a new story
As I'm logged in already to Twitter I clicked on the 'Log In' option on the first page and then 'Login with Twitter' on the second - this lets me authorise Storify to use my Twitter credentials.
Then I'll see a page like this

The options available to me (as a non-paying user) are 'All', 'Drafts', 'Published' and 'Edited'. You can also publish a private Storify to share with selected people, but not without paying.
On the top right of the image above 'New Story' will create a fresh editing window with a whole load of icons on the right hand side.

The editing window is split in two. On the left is where you create your story. On the right is where you search for and select what you'll put in it.
3. Twitter and other social media services
The icons on the right let you filter your search for social media items by different services.

Figure 6a. Storify: all the options
The options are
- Storify (selected in the picture above)
- Embed URL - this one is really useful
- YouTube
- Gifs
- Flickr
- Getty Images
- Google search
- Soundcloud
- Tumblr
- RSS feed
- Google+
- Disqus
- StockTwits
(note: if your screen isn't set at full width then some of these might appear hidden behind three dots •••).
Each icon has its own sub-options, which are grey icons or text below the larger grey icons, and some examples are shown below

Figure 6b. Storify: the options for Storify search - Search, Saved Elements, Stories, Elements

Figure 7. Twitter: the options for finding tweets - Search, then the others are denoted by icons. Person icon is 'user' so type in username to see their tweets, 'star' to see their favorites. The clock icon shows you your own timeline.

Figure 8. Flickr: The options for searching Flickr include selecting photos with a CC licence and viewing the public photos from any user.
4. Twitter in depth: adding tweets to your Storify
I think most people probably use just this option alone and collect a bunch of tweets from a user, a conversation or a hashtag. To do this click on the Twitter icon and then search for a hashtag or a user (you can search their name to see tweets sent to or from them, or use from:username just for those they sent [or use the 'User' option].
Pro tips:
(1) When you search, eg for the hashtag #twitterhelp, Storify will show you 50 results which you can transfer into the editing pane on the left. Don't do this yet. Scroll to the bottom and choose the 'Show more results' (and keep doing this until Storify stops producing more tweets). It's best to get the maximum number in this right hand pane before transferring them. If you transfer your first 50 you have to re-run the search to find more (and you end up duplicating).
(2) You can eliminate unwanted tweets (eg spam tweets, spam links, irritating users etc) by subtracting them from your search - eg #twitterhelp -jobrodie would bring up tagged tweets that everyone had sent except me.
(3) If you're just after a few tweets select the ones you want from the results on the right but if you want large numbers it's probably easier to move all the results into the left pane and then delete the ones you don't want.
(4) Caution: be aware that publishing your Storify may alert one or more of the people whose tweets you've included, even if you don't share a link to your story. People can sign up to Storify and may receive an email alert if one of their tweets is used. If you prefer not to make this obvious then keep it as a draft (or pay to publish it privately). In order to save or publish your Storify you'll need to give it a title.
If your Storify will contain only tweets then you're pretty much done unless you want to refine things a bit by re-ordering the tweets (so the earliest appears first rather than reading backwards in time) or adding in a bit of context.
Adding context with a text box
Note that this is best done after re-ordering.
Click between any two tweets to bring up a text box that lets you write and format text. In the picture below there are formatting options that appear when you select some text.

Figure 9. Adding commentary: inserting a text box
- H = toggle between making the text a heading or regular paragraph text.
- Clock icon - prints the current date and time.
- Link icon - hyperlink the text with a web address
- Anchor icon - link to a section within the Storify (you'll need to have created one or more H header sections)
- B / I / U /
S= bold, italic, underline, strikethrough.
Re-ordering the items
You can click and drag any item up or down and drop it somewhere else in the list - the collapsed view is particularly good for helping with this. You can also automate this by clicking on the Reorder button (shown below, next to the Collapsed view option) and pick which you prefer. I'm a fan of reading the things in the order they were posted so tend to prefer the 'Reorder by oldest first'.
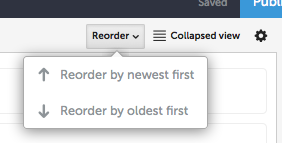 If your Storify contains a conversation happening among more than two people it's possible that tweets sent later will be in response to an earlier tweet - you can manually move these up or down to maintain the threads.
Caution: if you have added a text box during editing Storify will treat is as a recent item and reordering will move it away from the tweets or section that you originally placed it in. I recommend doing any reordering first, then adding in supplementary text.
5. Using the Embed link / Embed URL icon
This is a really useful option and I think it of it as a sort of override button when all else fails. You will find when searching Storify for tweets that many won't appear. This is because the search on Storify doesn't go as far back in time as Twitter.
This doesn't matter because you can find the tweet on Twitter.com (desktop is best for searching), then copy its URL over to the Storify. Every tweet has a timestamp and its URL can be found by hovering over that and copying the link (right click / copy link location).
Similarly every Facebook post has its own timestamp from which you can collect the link (you'll only be able to use it though if the post is set to be public) and every Instagram picture has its own link too. These links can be pasted into the embed URL search bar and the 'item' should appear for you to drag into the appropriate place on the story.
6. Setting the main image icon
By default Storify will use whatever image appears at the top of your story, so if someone's tweet has a picture in it and that's at the top of your story that's the one that'll get used.
You can pick a different picture, but you will have to publish the post first to do this.
a) Publish your post
It's the blue button with 'Publish' on it!

b) View your published Storify story
Click on the green 'Published' button that replaces the orange 'Draft' button. That tiny down-arrow will unfurl a menu from which you can select 'View Published Story'.

c) Choose a different image
Hover over any image, or item that contains an embedded image and some options will appear to the right. If you see the third grey icon in the options to the right of the picture (third one below, looks cunningly like a picture) then you can click that to select that particular image as the one that will appear at the top. Were someone, perhaps you, to add the link to your Storify story on Facebook etc then that's the image that will now be associated with it.

d) Log out
Once you've finished creating, editing, saving or publishing your story you can log out using the tiny little down arrow to the right of your username.

7. Things to be aware of - a round-up
a) The content (a tweet, the abstract of a blog post) added to Storify will remain there even after it is deleted from the main service.
b) If you add a lot of tweets and decide to reorder them do that bit before adding in any other commentary, otherwise you'll reorder your commentary out of the order you wanted it in
c) Publishing a story is a public act even if you don't tweet out the Storify's link or share it anywhere. Anyone who has previously used Storify themselves may be notified, by email, that one of their tweets etc has been used in your Storify so they may hear about it. If in doubt, keep it as an unpublished draft.





 Posts
Posts

