Last week I read an article and one of the commenters happened to say "Maybe the iPhone will finally get copy and paste!" - but it already does and anyone who's ever read any of my blog posts will know how much I love writing technical instructions, so here are some ;)
Copying an URL to send to someone else, eg from a Tweet - three methods
1. Tapping the URL sharply, or even lightly pressing it would just open it, you need to press and hold on the URL for about two seconds - a menu will appear with the URL in it saying Open, Copy or Cancel - Copy's the one you want here. You can use this to find out what an URL actually is, as a sort of taskbar proxy (I hardly ever click on an URL on my laptop without hovering over it first to see where it's going). This technique does not expand shortened URLs though.
2. Press and hold anywhere on the screen that isn't the URL, for about two seconds, then let go - a selection tool will appear allowing you to select the text within two blue bars. When you've moved the bars to what you want to pick click the Copy link button that's by now already on the screen. This is the generic way to copy any text on your iPhone.
3. I think most Twitter clients for iPhone have the facility where you can email a Tweet. You don't have to actually email it of course, it just opens a new email with the content of the tweet and your URL of interest within it and it's a bit easier to clip it out neatly than using the method in 1.
Also, bonus tip. If you touch the top of your screen you're immediately pinged back to the top of the page with a superfast scroll.
And pressing the two main buttons (one at the front plus one at the top) together takes a screenshot which is then stored in your camera roll.
I expect everyone has iPhone 4s now but I was so surprised that someone hadn't found the copy and paste function I thought I'd mention it in case others hadn't too.
Showing posts with label "iPhone tips". Show all posts
Showing posts with label "iPhone tips". Show all posts
Monday, 7 March 2011


Saturday, 23 January 2010
How to transfer downloaded videos to iPhone
I found this page to be a really useful guide on how to do this. Probably that page is all anyone would need, but to add a bit to it I've included some screen shots of the system I use, which I hope are helpful.
If you've already got the files on your computer, jump to Bullet Point 7.
My computer is running Windows XP and I downloaded RealPlayer SP from Real which includes the RealPlayer SP Converter.
RealPlayer SP enables you to download any video that is either playing, or ready to play on the screen (a little pop up window appears giving you the opportunity to 'download now').
RealPlayer SP Converter can convert the downloaded video into a range of media, including .m4v files suitable for playing on an iPhone.
So the first step would be to download RealPlayer SP....
Once downloaded, pick a video you want to watch - for the benefit of nostalgia I chose the last ever outing of the ITV Schools Rotomotion logo from YouTube.
1. The 'Download this video' option appears ... highlighted in orange
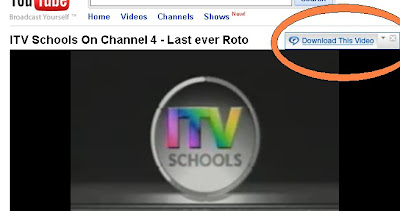
2. Clicking the 'Download this video' link brings up the downloader, which looks like this
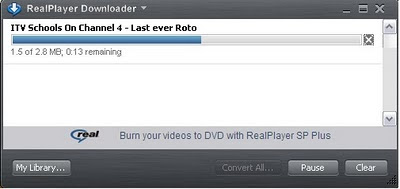
(Note that 'Convert All...' , to the left of Pause, is greyed out until the video finishes downloading.)
3. Once the video is downloaded, the programme will give you the option to convert it to a different filetype - that page looks like this - I've already selected the Apple iPhone option and where I want to store the video.
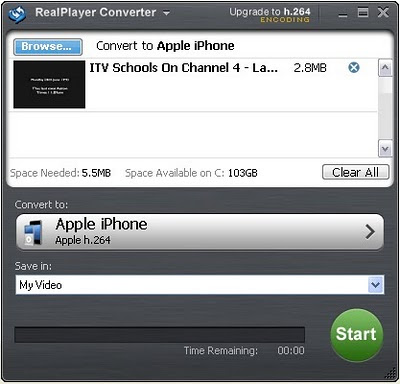
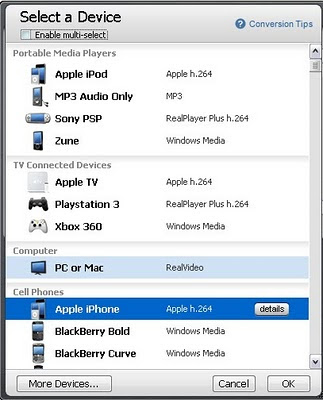
4. Because I've used it before it's already set to 'Convert to:' Apple iPhone / h.264 but there are other options, some examples of which are below
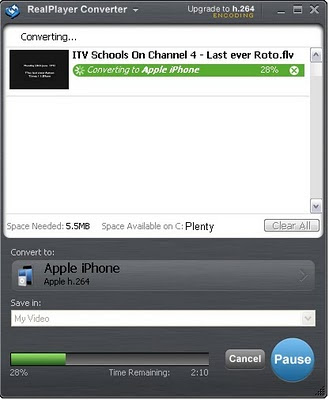
5. OKing the green Start button (in 3) starts the conversion process.
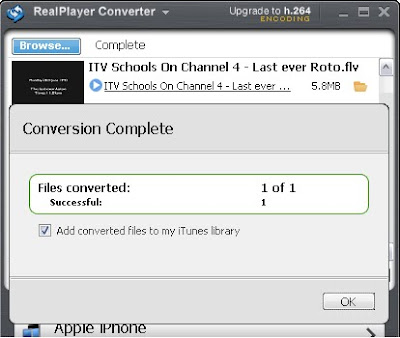
6. Once the file is converted you're given the option to save it to iTunes by clicking 'Add converted files to my iTunes library'.
7. If you've already got files on your computer and want to add them to the iTunes library, follow Step One of this page. iTunes does have its own converter - select a media file from within your library, right click and choose the option highlighted in red below.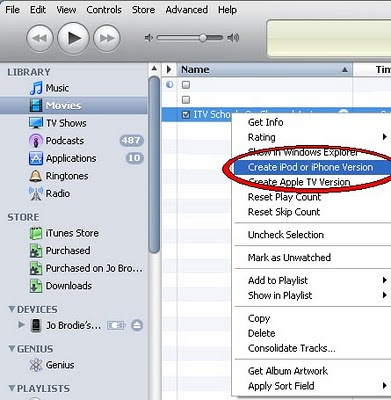
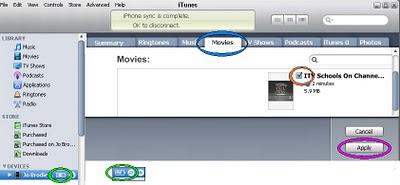
8. To get the video onto your iPhone, connect it to your computer and wait for it to be recognised. Click on the battery icon that comes up next to the DEVICES menu (highlighted in green in the screen capture below) and this will bring up everything that's on your phone. Click the 'Movies' tab (highlighted in blue), tick the check box for your video (in orange), then apply (purple).
The phone will probably automatically sync, but if not, click File / Sync 'your phone'. Open he iPod icon on your phone, let the library update and your file should now be there.
I've heavily edited some of the screenshots so let me know if they're less useful than I think they are and I'll upload the full size versions to Flickr.
If you've already got the files on your computer, jump to Bullet Point 7.
My computer is running Windows XP and I downloaded RealPlayer SP from Real which includes the RealPlayer SP Converter.
RealPlayer SP enables you to download any video that is either playing, or ready to play on the screen (a little pop up window appears giving you the opportunity to 'download now').
RealPlayer SP Converter can convert the downloaded video into a range of media, including .m4v files suitable for playing on an iPhone.
So the first step would be to download RealPlayer SP....
Once downloaded, pick a video you want to watch - for the benefit of nostalgia I chose the last ever outing of the ITV Schools Rotomotion logo from YouTube.
1. The 'Download this video' option appears ... highlighted in orange

2. Clicking the 'Download this video' link brings up the downloader, which looks like this

(Note that 'Convert All...' , to the left of Pause, is greyed out until the video finishes downloading.)
3. Once the video is downloaded, the programme will give you the option to convert it to a different filetype - that page looks like this - I've already selected the Apple iPhone option and where I want to store the video.

4. Because I've used it before it's already set to 'Convert to:' Apple iPhone / h.264 but there are other options, some examples of which are below

5. OKing the green Start button (in 3) starts the conversion process.

6. Once the file is converted you're given the option to save it to iTunes by clicking 'Add converted files to my iTunes library'.

7. If you've already got files on your computer and want to add them to the iTunes library, follow Step One of this page. iTunes does have its own converter - select a media file from within your library, right click and choose the option highlighted in red below.

8. To get the video onto your iPhone, connect it to your computer and wait for it to be recognised. Click on the battery icon that comes up next to the DEVICES menu (highlighted in green in the screen capture below) and this will bring up everything that's on your phone. Click the 'Movies' tab (highlighted in blue), tick the check box for your video (in orange), then apply (purple).
The phone will probably automatically sync, but if not, click File / Sync 'your phone'. Open he iPod icon on your phone, let the library update and your file should now be there.

I've heavily edited some of the screenshots so let me know if they're less useful than I think they are and I'll upload the full size versions to Flickr.
Thursday, 31 December 2009
iPhone screenshot or taking a 'photo' of your iPhone screen
I discovered how to do this quite by accident, after playing with all the five buttons on my iPhone and trying them in different permutations.
How to take a screenshot with your iPhone
Press the 'sleep' button and the 'home' button simultaneously (see first photo below) - the screen will 'blink' as if taking a photo (if you have the ringer button set to on it will make a camera sound).
The photo is now in your Camera roll.
See demo photos (second and third photos) at the end of this post.
Why would you want to do this?
I use this A LOT when I'm going to be travelling somewhere and can't guarantee I'll have a good wifi or 3G signal, and I might need to have a local map with me. So I check the map via my home wifi and screenshot it for use later. Clearly I also use this function for demonstration purposes too ;)
Further info
The relevant buttons are marked on this photo which I pinched from Wikimedia then tweaked.
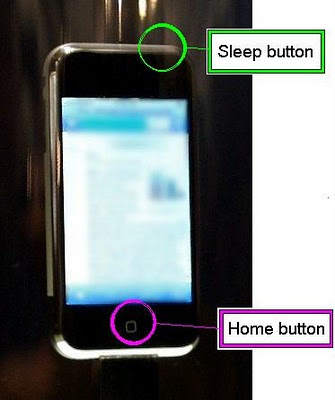
Photo credit: Flickr user lecates (http://www.flickr.com/photos/lecates/354510858/), taken from Wikimedia (http://commons.wikimedia.org/wiki/File:Apple-iPhone-001.jpg).
Examples
Screenshot of iPhone map showing London Zoo

Close up - keeping this sort of thing in my Camera Roll means I'm less likely to get lost even if there's no signal.

How to take a screenshot with your iPhone
Press the 'sleep' button and the 'home' button simultaneously (see first photo below) - the screen will 'blink' as if taking a photo (if you have the ringer button set to on it will make a camera sound).
The photo is now in your Camera roll.
See demo photos (second and third photos) at the end of this post.
Why would you want to do this?
I use this A LOT when I'm going to be travelling somewhere and can't guarantee I'll have a good wifi or 3G signal, and I might need to have a local map with me. So I check the map via my home wifi and screenshot it for use later. Clearly I also use this function for demonstration purposes too ;)
Further info
The relevant buttons are marked on this photo which I pinched from Wikimedia then tweaked.

Photo credit: Flickr user lecates (http://www.flickr.com/photos/lecates/354510858/), taken from Wikimedia (http://commons.wikimedia.org/wiki/File:Apple-iPhone-001.jpg).
Examples
Screenshot of iPhone map showing London Zoo

Close up - keeping this sort of thing in my Camera Roll means I'm less likely to get lost even if there's no signal.

Subscribe to:
Posts (Atom)



 Posts
Posts